Ever wanted to impress your friends with some cool origami skills? Look no further than the Ninja Star Origami! This classic design is a fun and easy project for both kids and adults to enjoy.
All you need is a square piece of paper and a few simple folds to create your very own Ninja Star. But if you’re a visual learner like me, having printable instructions on hand can make the process even easier. Let’s dive into the world of Ninja Star Origami together!

Ninja Star Origami Printable Instructions
Ninja Star Origami Printable Instructions
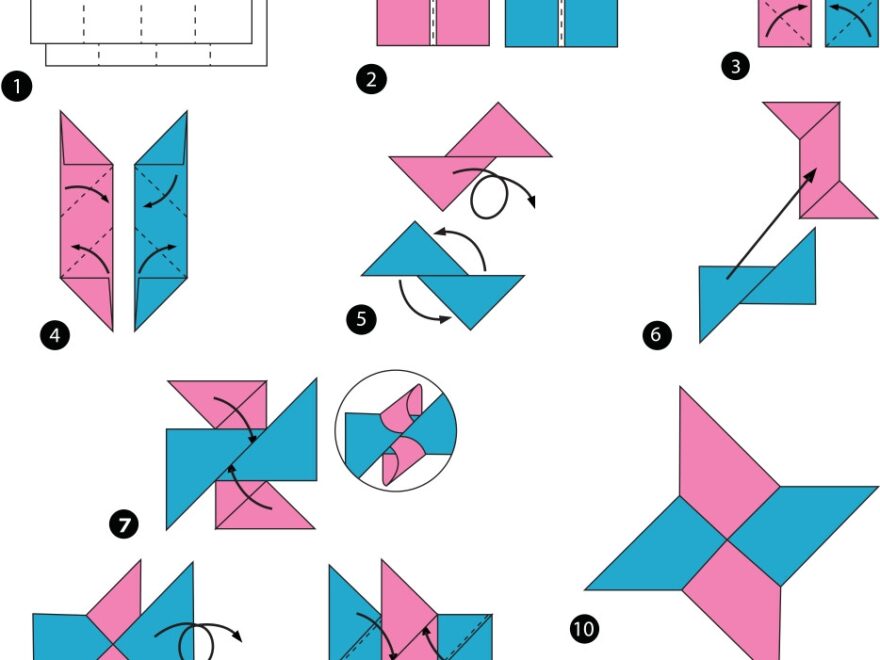
To begin, start with a square piece of paper. Fold it in half diagonally to form a triangle. Then, fold the triangle in half again to create a smaller triangle. Next, fold the top corners of the triangle down to the bottom point, creating a diamond shape.
Now, fold the bottom point of the diamond up to meet the top edge. Flip the paper over and repeat the fold on the other side. Once you’ve completed these folds, you’ll have two smaller triangles on each side of the paper.
Take one of the triangles and fold the top corner down to form a smaller triangle. Repeat this step on the other side. Your Ninja Star is starting to take shape! Now, fold the two outer corners of each triangle towards the center line to create the points of the star.
Finally, tuck the remaining flaps into the pockets of the points to secure the Ninja Star in place. And voila! You’ve successfully folded your very own Ninja Star Origami. With these printable instructions, you can easily follow along and master this classic design in no time.
So, next time you’re looking for a fun and creative activity, give Ninja Star Origami a try. With just a few simple folds and a piece of paper, you can create a cool and impressive piece of art. Happy folding!

39 Origami Ninja Star Ideas Origami Ninja Star Origami Paper

Origami Ninja Throwing Star Smashed Peas Carrots

How To Make An Origami Ninja Star

How To Make An Origami Ninja Star

Step Instructions How To Make Origami A Ninja Star